Up until a couple of weeks ago, I used Eclipse/Aptana as my default development environment for web and mobile software. Even tough the combination of Eclipse and Aptana provided most of the things I expect from an IDE, it always felt a bit slow and not very responsive (I’m using a Mac, so this may not be true for Eclipse installed on Windows, Linux or any other operating system). So I was looking for something new, and @wolframkriesing recommended ActiveState’s Komodo Edit, which I have been using since then.
To make (W3C) widget development a bit easier for me, I created some custom file templates for Komodo Edit, which I am going to show you in this post. Maybe you find them useful, too.
Please visit ActiveState’s Komodo 5.0 Documentation to learn how to create custom templates.
Configuration file (config.xml)
The first thing I usually create for a new widget is a configuration file (config.xml). So the first thing I did was to create a template that makes it easy to create a complete configuration file. When you create a new file from this template, you will get asked a couple of questions, for example widget name, initial width and height of the widget and so on. Enter all relevant information and click the button labeled : et voilà, a working config.xml for you widget.
<?xml version="1.0" encoding="utf-8"?>
<widget id="[[%ask:Widget-ID:http://www.myhost.xx/MyWidget]]" version="1.0.0.0">
  <widgetname>[[%ask:Widget Name:My Widget]]</widgetname>
  <description>[[%ask:Widget Description:Describe what you widget does.]]</description>
  <width>[[%ask:Width (pixel):240]]</width>
  <height>[[%ask:Height (pixel):320]]</height>
  <icon></icon>
  <author>
    <name>[[%ask:Author Name:Your Name]]</name>
    <organisation>[[%ask:Organisation:Your Company]]</organisation>
    <email>[[%ask:E-Mail:Your E-Mail]]</email>
    <link>[[%ask:Web:Your Homepage]]</link>
  </author>
  <security>
    <access>
      <host>[[%ask:Host 1:http://api.myhost.xx]]</host>
    </access>
  </security>
</widget>
Build file (build.xml)
Before you can transfer a widget to a mobile device, you have to zip all folders and files and change the extension of the .zip-file to .wgt. To make this task easier, I use the Apache Ant build tool. This tools needs an XML build/configuration file, which you can create very easily if you use the following template.
<project name="[[%ask1:Project Name:My Project]]" default="dist" basedir=".">

  <description>
    This is the ant build file for the [[%ask1]] widget.
  </description>

  <property name="dist" location="dist" />
  <property name="src" location="src" />

  <target name="clean">
    <delete dir="${dist}" />
  </target>

  <target name="dist.widget">
    <mkdir dir="${dist}" />
    <zip zipfile="${dist}/${ant.project.name}.wgt">
      <fileset dir="${src}">
        <include name="**/*" />
      </fileset>
    </zip>
  </target>

  <target name="dist" depends="dist.widget" />

</project>
The folder structure of all my widgets looks similar to the one in the screenshot below. In order for this build file to work correctly, you have to have all source files within a folder named src that resides directly in the root folder of your widget project. The .wgt file will then be created in a directory named dist, which will automatically be created if it does not exist. If your source files are stored in a different folder, you have to alter the template accordingly (line 8).
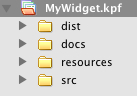 Screenshot 1: Widget folder structure
 Build file with version information (build.xml)
The widget-node in the config.xml file has an attribute named version. Would it not be nice to somehow use this version information in the build process? Below is a slightly altered version of the above build.xml file that extracts the version information out of the config.xml file and uses it to name the .wgt file, for example MyWidget_0.1.0beta.wgt.
In order for this to work, you need the Ant-Contrib tasks library, which you can get from the Ant-Contrib project page. After downloading the .jar file - I use ant-contrib-0.3.jar - copy it to the lib directory of your Ant installation. That’s it, you are done.
<project name="[[%ask1:Project Name:My Project]]" default="dist" basedir=".">

  <description>
    This is the ant build file for the [[%ask1]] widget.
  </description>

  <taskdef resource="net/sf/antcontrib/antcontrib.properties" />

  <property name="dist" location="dist" />
  <property name="src" location="src" />

  <xmlproperty file="${src}/config.xml" />

  <if>
    <matches string="${widget(version)}" pattern="^\$\{widget\(version\)\}" />
      <then>
        <property name="version" value="_v0.0.0.0" />
      </then>
    <else>
      <property name="version" value="_v${widget(version)}" />
    </else>
  </if>

  <target name="clean">
    <delete dir="${dist}" />
  </target>

  <target name="dist.opera">
    <mkdir dir="${dist}" />
   	<zip zipfile="${dist}/${ant.project.name}${version}.wgt">
      <fileset dir="${src}">
        <include name="**/*" />
      </fileset>
    </zip>
  </target>

  <target name="dist" depends="dist.opera" />

</project>
I am in no way an Ant expert, so if you know how to do this in a simpler way, please leave a comment below.
Run command for building a widget
 Screenshot 2: Add command to Komodo Edit
 Now that you have this nice build file, how about a custom run command within Komodo Edit to actually build a widget? Open the Toolbox pane, click the icon and choose New Command… from the drop-down list. Enter a name for the new run command, e.g. Build Widget. In the Command input field, enter /PATH/TO/ant -f %p/build.xml, where you would have to alter /PATH/TO/ant to the actual installation of Ant on your system (on my Mac, it is /usr/bin/ant).
If you want to assign a keyboard shortcut to start the build process, click on the Key Binding tab at the top of the window. Click into the New Key Sequence input field and press the keys you want to assign. For example, Ctrl+Shift+B. Afterwards, click the button.
Finally, click the button in the lower right corner of the window. And that is how it is done.
Final words
Hopefully, these templates will help you to create your widgets more easily. I will probably post some more templates and/or run commands in the future, because I really think I will stick with Komodo Edit for a while. So please check back or subscribe to my RSS feed.