One of the most powerful things AngularJS provides is called directives. From the AngularJS documentation:
At a high level, directives are markers on a DOM element (such as an attribute, element name, comment or CSS class) that tell AngularJS’s HTML compiler ($compile) to attach a specified behavior to that DOM element or even transform the DOM element and its children.
Simply put, it means that you can extend an existing HTML element with new interactions and/or behavious. And you can do even more: you can create your own HTML elements complete with interaction, behaviour and styling. In fact, directives are the only way how you should manipulate the DOM (see https://docs.angularjs.org/guide/concepts#directive).
In this tutorial we are going to create a very simple customizable dialog directive.
The template
First, we need an HTML template that will represent our directive in the DOM:
<div class="my-dialog" ng-show="show">
  <div class="content">
    <div class="title">{{ dialogTitle }}</div>
    <div class="text">{{ dialogText }}</div>
    <div class="buttons" ng-transclude></div>
  </div>
</div>
The template needs to have exactly one root element and we use it to show and hide our dialog. The first child of the root is a container for the dialog’s actual content: The dialog’s title, the text that should be shown and a <div> that holds one or more buttons so that the user is able to interact with the dialog.
Note that we make use of the ng-transclude directive provided by AngularJS for the button area. This directive “marks the insertion point for the transcluded DOM of the nearest parent directive that uses transclusion” (from https://docs.angularjs.org/api/ng/directive/ngTransclude). This means, whenever we make use of our directive, anything that is a child element of the directive’s DOM element will be inserted at this point. Don’t worry, this becomes very clear in the example later in this tutorial.
The directive
Now that we have a template, we need to “register” a new directive with our AngularJS app.
angular.module('myApp').
  directive('myDialog', [ function() {

    return {

      // Replace the DOM elment that includes our directive with the directive's HTML
      replace: true,

      // Restrict usage to elements only -> can't be used as attribute
      restrict: 'E',

      // The file that holds our template
      templateUrl: 'components/dialog.tpl.html',

      // We want to include some other HTML
      transclude: true,

      scope: {

        // Two way binding to either show or hide the dialog
        show: '=',

        // One way binding for dialog title
        dialogTitle: '@',

        // One way binding for dialog text
        dialogText: '@'

      }

    }

  }]);
We call our directive myDialog and define it by returning a configuration object. We tell it to replace the HTML that “asks” for our directive, restrict it’s usage to elements only, reference the directive’s template and so on (see comments in the code for further explanations).
And that is all we need for our little dialog directive.
Example
Let’s take a look at an exmaple on how to use our new directive. First, we create an app and a controller that handles whether or not a dialog is visible:
var app = angular.module('myApp', [ ]);

app.controller('appController',
  [ '$scope', function($scope) {
    $scope.isDialogVisible = false;

    $scope.showDialog = function() {
      $scope.isDialogVisible = true;
    };

    $scope.closeDialog = function() {
      $scope.isDialogVisible = false;
    };

  }
]);
Second, we create a little HTML to include our newly created directive:
<!-- snip -->
<body ng-controller="appController">
  <button ng-click="showDialog()">Show dialog</button>
  <my-dialog show="isDialogVisible"
            dialog-title="Hello World!"
            dialog-text="You could write whatever you want here.">
    <button ng-click="closeDialog()">Close</button>
  </my-dialog>
</body>
<!-- snip -->
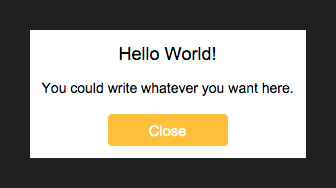
With a little CSS, our directive could look like this:
 AngularJS Directove - Dialog
 Final words
Of course, this is just a very basic example. More advanced topics are coming in another post. All code can be found on GitHub. Please leave any remarks or questions in the comments below.